**CLC Genomics Cloud Engine Command Line Tools v20.0.10

USER MANUAL** ![](./images/QIAGEN.png)


Command Line Tools manual for the CLC Genomics Cloud Engine

Mon Jan 13 2020


QIAGEN Aarhus A/S
Silkeborgvej 2
Prismet
DK-8000 Aarhus C
Denmark # Introduction Welcome to the _CLC Genomics Cloud Engine Command Line Tools_ user manual. The CLC Genomics Cloud Engine Command Line Tools (CLT) is a command line client for the CLC Genomics Cloud Engine (GCE). The command line tools are well–suited for automation in production environments where tasks can be automatically generated by custom scripts. This allows for processing a large number of data sets in a consistent manner. Workflows to be submitted to the CLC Genomics Cloud Engine service are created using a CLC Workbench. This is described in some detail later in the manual. Workflow installer files should be made using a CLC Workbench compatible with the CLC Genomics Server version being used by GCE. The Compatibility section of the [Latest Improvements information for each GCE version](https://www.qiagenbioinformatics.com/products/clc-genomics-cloud-engine/latest-improvements/) lists the CLC Workbenches compatible with relevant CLC Genomics Server versions. # Installation The _CLC Genomics Cloud Engine Command Line Tools_ installer can be downloaded from the [release webpage](../../index.html) and is available for Linux, Windows, and Mac. You can install the client on any computer that has access to a running CLC Genomics Cloud Engine service and an AWS account where input data can be stored. System requirements (recommended): - Linux, Ubuntu Desktop 14.04 LTS or later (64 bit) - Windows 7 or later (64 bit) - Mac OS X 10.9 or later - Java 8 or later Runtime Environment No software license is required for running the _CLC Genomics Cloud Engine Command Line Tools_. ## Using the tool The primary use of the CLT is to submit an analysis for execution. This use-case typically involves the following steps: 1. Configure analysis using the CLC workbench (workflow file) 2. Upload workflow and data to be analysed to S3 3. Submit analysis jobs to GCE using the CLT. A job is defined by a CLC Workflow file along with one or more input parameter files. Paths are provided as S3 URLs. Reference data for biomedical ready-to-use workflows are downloaded automatically as needed 4. Poll GCE for job status using the CLT until the job is complete (status events over Amazon SNS is also supported. This feature is described in the admin manual) 5. Request result file URLs from GCE using the CLT 6. Download results from S3 to local storage for further analysis and visualization (all or parts of the output) Once the CLT is installed it can be invoked using the `gce` program located in the installation folder. The program is invoked with a *command group* and a *command* to execute within that group. A list of command groups is provided below. * config * version * job * help In the following each of the command groups are described in detail. The commands under the groups `config` and `version` are mainly used for initial setup and maintenance. They are described in detail in the following sections regarding installation and configuration. The remaining command groups follow in chapter 2. # Configuration The following sections describe the steps needed to configure the CLT using the `gce config` commands. In summary, the following configuration steps are needed: * Install custom root CA in the local trust store (If relevant) * Obtain GCE user id and authentication token * Configure the CLC Genomics Cloud Engine service * Configure AWS credentials for use by the CLT The CLT can store multiple configurations in separate profiles. This can be particularly useful when working with several GCE services (environments). ## How to install a custom root CA in the trust store In most cases the SSL certificate of the GCE service will be trusted by a global root CA certificate and no configuration is needed on the user side. However, if you are using a custom PKI with a corporate root CA you must install the root CA certificate into the local trust store. To see the list of currently trusted root CA certificates, use this command (output has been truncated for clarity): ````none $ gce config ssl-list-certs The trust store contains the following certificates: CA NAME | SHA 1 THUMBPRINT --------------------------------------------+----------------------------------------- CN=AAA Certificate Services, O=Comodo CA Lim| D1EB23A46D17D68FD92564C2F1F1601764D8E349 CN=Actalis Authentication Root CA, O=Actalis| F373B387065A28848AF2F34ACE192BDDC78E9CAC ... OU=VeriSign Trust Network, OU="(c) 1998 Veri| 85371CA6E550143DCE2803471BDE3A09E8F8770F ```` If the SSL server certificate is already provisioned to the Genomics Cloud Engine service, you can verify the certificate with the following command: ````none $ gce config ssl-trust-host -url https://gce.us-west-2.elasticbeanstalk.com ```` This command will show information about the certificate chain and the root certificate to be trusted. The SHA 1 thumbprint of the certificate is also shown to allow easy identification of the certificate. If the certificate shown is the correct one, it can be installed by adding the `-trust` option to the command above. Alternatively, if the certificate is available in a `pem` file, the `gce config ssl-trust-cert` command may be used. Note that the `gce` command line tool needs write permissions to its installation directory for these commands to execute successfully. ## How to obtain user id and authentication token You can use the `config get-credentials` command to obtain a link for the Genomics Cloud Engine enrollment page. By invoking this command and using the `-url` option to specify the address of the service, a web site address for opening in a browser will be displayed (e.g. `https://<'service URL'>/enroll/index.html`). Following this procedure and logging into the website using your federated authentication service, your GCE user id will be displayed and a new authentication token can be created. If a token has been issued previously, a new token can be issued to replace the existing token. ![Enrollment page for creating authentication token for accessing the CLC Genomics Cloud Engine service](./images/enrollment-create-token.png) Pressing the `Create new token` button will display a command line example that can be run in a terminal. Running this line will permanently store the user id and authentication token on disk for future use. ![Creating authentication token for accessing the CLC Genomics Cloud Engine service](./images/enrollment-token-created.png) ## How to configure the CLC Genomics Cloud Engine service The CLT must be configured for accessing the service provided by the CLC Genomics Cloud Engine at a given URL using given credentials. This is done using the `config service` command as shown in the following example: ````none $ gce config service -user <'user'> -auth-token <'auth-token'> -url <'service-url'> ```` Where `<'service-url'>` points to a given CLC Genomics Cloud Engine installation using the `<'user'>` and `<'auth-token'>`. The provided information is saved so it will only have to be entered once. The configuration will be stored as the default configuration unless a profile is specified. To store the configuration in a profile simply add the '-profile' option followed by a name of your choice. To use this profile use the '-profile' option again when issuing a command. All relevant commands support the profile option. In most cases it is desirable to constrain the CLT to only use data from a specific AWS region , since inter-region traffic can be both costly and reduce performance. Normally, such a data region constraint is automatically derived from the service path specified in the configure command, e.g. the path `http://mycloud.us-west-2.elasticbeanstalk.com/` will constrain data access to region _us-west-2_ by default. If the region constraint cannot be derived from the service path it is possible to specify it manually using the `-region` switch: ````none $ gce config service -url http://mycloud.com/service -region us-west-1 ```` When a specific AWS region constraint is set the CLT will verify that all input parameters, workflows and output locations are located in this region. If you do not wish to use the region check for some reason, it can be disabled by either specifying an empty region or setting it to `any`, eg.: `-region ""` or `-region "any"`. When running the `config service` command the tool checks if it can communicate with the service and that the service provides a compatible API. Use the `version` command for information about versioned dependencies (see section [#Show version information]). ## AWS credentials Normally, the CLT needs to be configured with AWS credentials in order to generate pre-signed URLs for your input data files and CLC workflow files on Amazon S3. The use of pre-signed URLs make it possible to grant the CLC Genomics Cloud Engine temporary read access to specific files in your S3 buckets, without setting up permanent conventional permissions. Setting up AWS credentials is done using the `config aws` command: ````none $ gce config aws -access-key <'aws access key'> -secret-key <'aws secret key'> ```` Where `<'aws access key'>` and `<'aws secret key'>` are referring to your AWS credentials (obtained from AWS). Both service and AWS configurations and credentials are stored in a `.gce/default.properties` file located in your home user folder. The configuration can alternatively be stored in a named profile, which will result in a similarly named properties file. To store the configuration in a profile simply add the '-profile' option followed by a name of your choice. To use this profile use the '-profile' option again when issuing a command. All relevant commands support the profile option. If a profile only contains a partial configuration, the default configuration will be used for the parameters which are not defined. This can be useful when handling several GCE environments, while using the same AWS credentials. In this case the profiles only have to contain the service configuration and the default AWS credentials are used for all command invocations. ## Show configurations and credentials The `config show` command is used for showing the current configuration and credentials stored in the property file. Example: ````none $ gce config show GCE Service configuration: service.url=https\://gce.us-west-2.elasticbeanstalk.com service.region=us-west-2 service.user=012345678901234567890 service.authToken=1psLKASHJ2JwOSDLnAA34L\=\= AWS Service configuration: aws.accessKey=AKIAXXXXXXXXXXXXUD4Q aws.secretKey=EpV+aoUDGWXXXXXXXXXXXXXXXXXXXXXXXsLdtLQA ```` ## Show version information The `version` command is used for showing version information for the Command Line Tools client and the associated CLC Genomics Cloud Engine service. This command is particularly useful when checking if the client and service are using compatible versions of the API. Example: ````none $ gce version CLC Genomics Cloud Engine Command Line Tools: Version: 1.0 Service API: v1 Workflow package format: v1 CLC Genomics Cloud Engine Service: Version: 1.0 Service API: v1 ```` # Preparing to submit workflows to GCE In this section we outline the two key steps in preparing to submit workflows to GCE: designing workflows and creating workflow installers. ## Designing workflows for use on GCE Workflows to be run on GCE are designed using a CLC Workbench, generally the CLC Genomics Workbench. To avoid compatibility issues, designing is usually done on a Workbench version compatible with the CLC Genomics Server being used within your GCE instance. Workflows can be created from scratch, or by editing copies of installed workflows or workflows provided in QIAGEN Aarhus products. Information about designing workflows using the CLC Workbench workflow editor can be found in the Workbench manual at: . Additional requirements and considerations when creating workflows for use on GCE are outlined below. ### Results to be saved must be connected to an output element Tool outputs that should be part of the final workflow result must be connected to a workflow output element. ### A few tools are not supported on GCE A few tools are not currently supported on GCE and thus should not be included in workflows to be run on this system. These are: * Tools that modify the data elements provided as input, rather than generating a new data element with the results. Such input-modifying tools are marked with an M in workflow designs viewed in a Workbench, as shown in the figure below. * Differential Expression for RNA-Seq * Export to PDF * Tools configured as External Applications, (a feature available with the CLC Genomics Server) ![Input modifying tool in workflow design](./images/input-modifying-algo-in-wf-design.png) *Tools shown with an M in the workflow design element modify the inputs provided to them. These are not supported in workflows to be used on GCE.* ###Plugins must be made available on GCE before use Workflows containing tools distributed via plugins can be run on GCE as long as the GCE admin has installed the relevant plugins. Information about installing server plugins can be found in the Administration Manual section *Adding and updating CLC Genomics Server Plugins*. ### Choosing to lock or unlock parameter inputs Where data is provided as a parameter to a tool, (the brown boxes in a workflow design), the parameter input can be configured as locked or unlocked. This choice defines whether reference data can be specified when submitting a job to GCE or whether it is pre-defined and cannot be changed. It also affects the options presented for parameters when creating a workflow installer. That aspect is described in the "Reference data options for workflow installers" section later in the manual.
Desired level of flexibility Workflow requirements
Reference data inputs can be specified when submitting a job to GCE. Parameters are unlocked in the workflow design.
Reference data inputs are pre-configured and cannot be overridden when submitting a job to GCE. Parameter inputs in the workflow are locked.

Separate workflows would be needed if the same analysis should be run using different reference data.
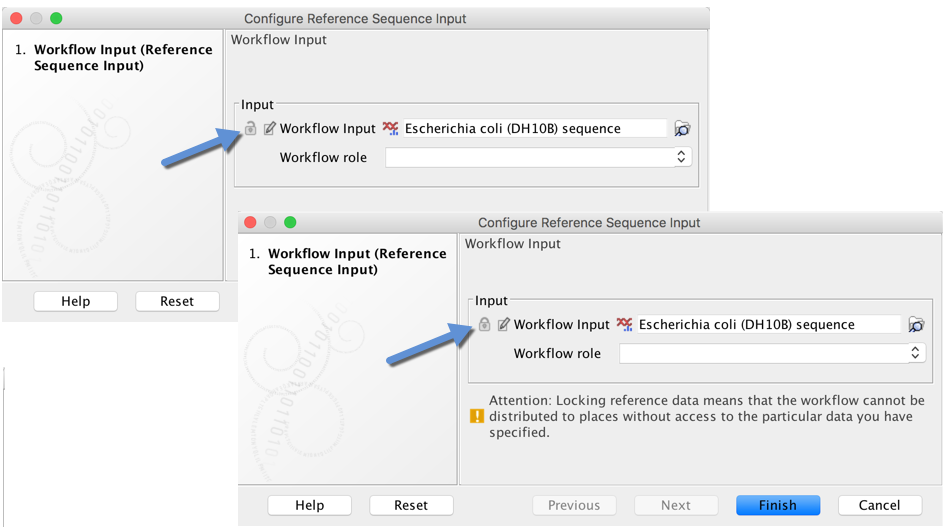
*Workflow parameter inputs can be configured as locked or unlocked. Values for unlocked parameters can be provided on the command line when submitting a job to GCE.* ## Creating a workflow installer Information about creating workflow installers can be found in the Workbench manual at: . Installer files (.cpw) should be created using a Workbench version compatible with the CLC Genomics Server being used by your GCE instance. An overview of creating a workflow installer file: * Click on the button labeled "Installation" in the bottom right hand side of the workflow editor in CLC Workbenches. This opens up a wizard allowing the creation of a workflow installer file. * If the workflow includes input elements (green boxes) connected to parameters (brown boxes), then the second step of this wizard will offer you two or three options, depending on the type of reference data you have. See the "Reference data options for workflow installers" section below for details. * In the final step, choose the option "Create an installer file to install it on another computer". This will create a file with a .cpw suffix. The workflow installer file (.cpw) must then be copied to an S3 bucket with relevant permissions, described in the "S3 permissions prerequisites" section later in this manual. ### Reference data options for workflow installers There are three options for handling reference data when creating a workflow installer, "Ignore", "Bundle" and "Reference". The meaning of each of these as pertains to GCE is described in the table below. *
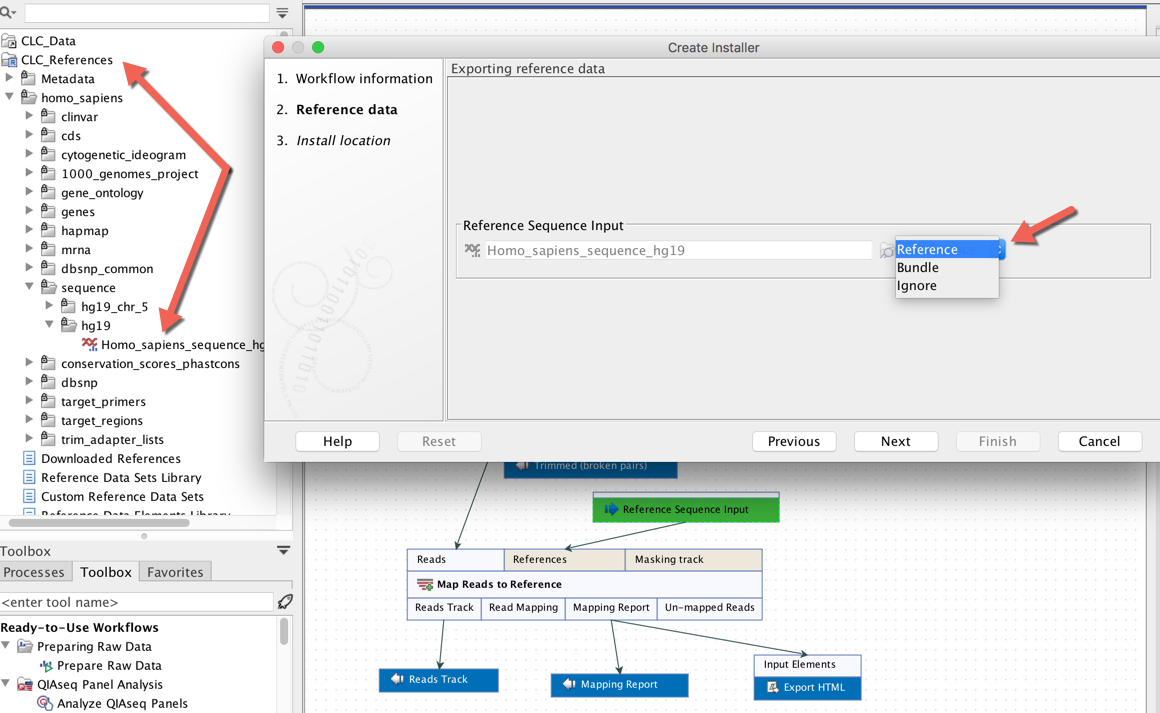
When creating an installer for a workflow, up to three options will be provided for each data input as a parameter of a workflow element, "Ignore", "Bundle" and in some cases "Reference".*
Workflow installer option What it means Workflow design requirements Recommended use
"Ignore" Reference data is specified via the command line when submitting the job to GCE.

The reference data must be uploaded to S3 prior to use.
Workflow parameter inputs should not be configured with data elements and must be unlocked. This is the standard way to work with reference data when running workflows on GCE.
"Bundle" The reference data does not need to be specified on the command line.

It is included within the workflow installer file. No separate upload of bundled reference data to S3 is needed.
Workflow parameter inputs must be configured with a reference data element for the "Bundle" option to be available when making an installer.

Workflow parameter inputs can be locked or unlocked.
Can be useful when using very small reference data elements.
"Reference" The reference data does not need to be specified on the command line.

It is downloaded as needed when the workflow is run on GCE. It does not need to be uploaded to S3 manually.
Workflow parameter inputs must be configured with a reference data element from a QIAGEN set for this option to be available when making an installer.

Workflow parameter inputs can be locked or unlocked.
Where this option is available, it is the most convenient option.
## Upload workflow installer files and data to S3 Workflow files and any reference data to be specified via a command line parameter need to be uploaded to S3 before jobs are submitted to GCE. ### Data preparation Before uploading to S3, some data may need to be exported from the CLC Workbench or CLC Genomics Server in CLC format. Specifically: * Reference data to be provided as parameter values in the GCE CLT command should be exported in CLC format. * Data for analysis, (i.e. the input to standard workflow input elements) should be exported in CLC format. *ZIP files containing CLC format data are not accepted by GCE.* ### Uploading to S3 Standard methods for uploading data to S3 should be employed. For large data sets we recommend the use of the [AWS CLI](https://aws.amazon.com/cli/) (command line client). To optimize performance and minimize costs, we recommend files be stored in buckets residing in the same AWS region as the GCE service operating on it. This is not a requirement, however. # Job handling Here the commands of the job command group are described. ## S3 permissions prerequisites Before jobs can be successfully submitted to GCE, appropriate S3 file permissions must be in place by the administrator of your AWS setup. In brief: - Read permissions for the AWS user used by the _CLC Genomics Cloud Engine Command Line Tools_ on all analysis input files. This includes input data, reference data and workflow files. - Read/write permissions on all output and export folders for the AWS account owning the GCE service. Note also that URLs to export folders must explicitly end with a forward slash in order to distinguish them from import data. Please refer to the "Data access" chapter of the admin manual for further details. ## Listing the input parameters of a workflow To get a list of the input parameters for a workflow, use the `job parameters` command with the mandatory -destination parameter. Below is an example of doing this for the simple workflow shown in the image. ````none --export-bam-export-destination The destination to export the files to --reference-sequence-input-workflow- Workflow Input (default: 'NC_001807 input (Genome)' referred as clc://local/- 1005512447- BAAAAAAAAAAAAAP64b255c9c8bf8935- 4e12aee4-1689491a585--7ffc/- 227824526- ABAAAAAAAAAAAAP2986b24292f654e1-- 292f3f9c-14085f50d22--8000) --sequences-to-analyze-workflow-input Workflow Input ```` *The gce job parameters listed reflect the workflow input elements, here "Sequences to Analyze" and "Reference Sequence Input", and export elements, here "Export BAM". The option "Bundle" was used for the "Reference Sequence Input" parameter when the installer for this particular workflow was created. The bundled data is the default, as indicated in the information in the right hand column.* ## Submitting an analysis job Once all credentials have been configured for accessing the CLC Genomics Cloud Engine Service and workflow files and data have been uploaded to S3, analysis jobs can be submitted using the `job submit` command. This takes the general form: ````none gce job submit -name <'name of job'> -tag <'optional tag'> -priority <'optional priority'> '-workflow <'CLC workflow file'> -d <'destination root url'> [-- input parameters] ```` Submitting the workflow shown in the section above could look something like this: ````none gce job submit -name myworkflowtest1 -workflow s3://mybucket/trimAndMapWorkflow1-0.1.cpw -destination s3://mybucket/tmp/ -tag wfwithbundledrefdata --export-bam-export-destination s3://mybucket/tmp/ --sequences-to-analyze-workflow-input s3://mybucket/myreadslist1.clc ```` The addition of "tmp/" to the end of export and destination parameters is due to AWS requirements for a S3 location key. Where more than one item should be provided as input for a given workflow parameter, this is specified by providing a parameter entry per element, as illustrated by extending the example above to specify 2 sequence lists as sequences to be analyzed by this workflow using the `--readsinput-workflow-input` parameter (at the end of the command). ````none gce job submit -name myworkflowtest1 -workflow s3://mybucket/trimAndMapWorkflow1-0.1.cpw -destination s3://mybucket/tmp/ -tag wfwithbundledrefdata --export-bam-export-destination s3://mybucket/tmp/ --sequences-to-analyze-workflow-input s3://mybucket/myreadslist1.clc --sequences-to-analyze-workflow-input s3://mybucket/myreadslist2.clc ```` Running `gce job submit help` will return a list of the parameters for this command: gce job submit (-destination | -d ) (-name | -n ) [-nosign] [(-priority | -p )] [-profile ] [(-tag | -t )] [-ttl ] (-workflow | -w ) [--] -- The values for the `job submit` parameters are: * `` The S3 URL of a folder under which result should be placed. A uniquely named subfolder of this location will be created, with a name based on the job id, and results placed in that subfolder E.g. given the destination root folder `s3://gentype-data/output/sample1233/`, results files would be placed in a location like: `s3://gentype-data/output/sample1233/9ba64902-b15f-4cb5-8158-f3248ea3f39c/`. * `` A name you assign for the job. It does not need to be unique. * `` Priority of the job. Allowed values are LOW,MEDIUM,HIGH, and ASAP. The default is MEDIUM. Priorities are described in the "Specifying and modifying job priority" section below. * `` Optional. A tag you assign to the job, which is carried through to the job result. * `` The S3 URL of workflow file. * `` The parameters for the workflow being submitted. The parameters for a workflow on S3 can be reported by running the `job parameters` command, described in the "Listing the input parameters of a workflow" section above. All input S3 URLs are automatically signed by the GCE CLT. It is possible to specify when the pre-signed URLs should expire using the`-ttl